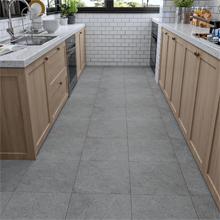
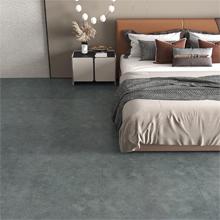
Cement-inspired vinyl tiles are an excellent choice for anyone wanting to achieve a sleek, modern aesthetic without the hassle and expense of installing real concrete. These tiles capture the industrial charm of concrete while offering the benefits of vinyl. They are versatile, durable and come in various styles to suit different tastes and needs.

Key Features to Look for in Vinyl Tiles
When selecting vinyl squares that mimic concrete, there are several essential features to consider:
- Authentic Appearance: Look for tiles with realistic textures and patterns. High-definition printing technology has made it possible to create vinyl planks that are almost indistinguishable from real concrete.
- Durability: Ensure the tiles are made from high-quality materials that can withstand heavy foot traffic. Wear layers and protective coatings add to the longevity of the tiles.
- Water Resistance: Vinyl pieces are inherently water-resistant, making them ideal for areas prone to moisture, such as kitchens and bathrooms.
- Ease of Installation: Many vinyl panels come with peel-and-stick or click-lock systems, simplifying the installation process.
- Comfort Underfoot: Unlike real concrete, vinyl feels softer and warmer underfoot, providing added comfort.
- Maintenance: Choose tiles that are easy to clean and maintain. Stain resistance is a crucial factor.

Vinyl Tiles vs. Real Concrete: Pros and Cons
Pros of Using Vinyl:
- Cost-Effective: Vinyl offers a budget-friendly alternative to real concrete, with a similar aesthetic at a fraction of the cost.
- Easy Installation: Ideal for DIY enthusiasts, smaller sections can be installed without professional help, saving on labor costs and allowing for quick project completion.
- Comfort: This resilient flooring provides a cushioned feel underfoot, making it more comfortable than the hard surface of concrete, especially in high-traffic areas.
- Versatility: Squares or planks can be installed over existing flooring, making them a flexible option for various renovation projects.
- Low Maintenance: Easy to clean and requiring minimal upkeep, they are a convenient choice compared to the more demanding maintenance of real concrete.
Cons of Vinyl:
- Durability: Although vinyl is known for its resilience, it does not match the longevity of concrete. For instance, heavy furniture or dropped objects can cause scratches and dents in vinyl, whereas concrete would remain unaffected.
- Environmental Impact: The production of this synthetic material involves the use of chemicals such as phthalates and dioxins, which can be harmful to the environment. Unlike natural concrete, vinyl manufacturing can contribute to pollution and environmental degradation.
- Value: While vinyl can enhance the appearance of a space, it typically does not add as much value to your property as real concrete would. For example, potential homebuyers might view real concrete flooring as a more premium, long-term investment compared to vinyl.

Step-by-Step Installation Guide
Installing slabs or tiles is a straightforward process that most DIYers can handle. Here’s a step-by-step guide:
- Prepare the Surface: Begin by meticulously cleaning, drying and leveling the subfloor. Remove any remnants of old flooring and thoroughly repair any damage to create a pristine base for your faux concrete tiles.
- Acclimate the Tiles: Place the tiles in the intended room for at least 48 hours. This acclimation period allows the tiles to adjust to the room’s temperature and humidity, ensuring optimal adhesion and stability.
- Plan the Layout: Carefully measure the dimensions of the room and strategize your tile layout. Initiate the installation from the center of the room, progressing outward. This method guarantees a balanced and aesthetically pleasing arrangement.
- Cut the Tiles: Employ a sharp utility knife to precisely cut the tiles, tailoring them to fit snugly around edges and corners. Accurate cuts are essential for a seamless finish.
- Apply Adhesive: For peel-and-stick tiles, remove the backing and press them firmly into position. If using glue-down tiles, evenly spread the adhesive across the subfloor before laying the tiles. Consistent adhesive application is key to a secure bond.
- Secure the Tiles: Utilize a roller to apply firm pressure across the tiles, eliminating air bubbles and ensuring a solid, even adhesion. This step is crucial for achieving a smooth and durable surface.
- Finishing Touches: Conclude the installation by adding baseboards or trim to conceal the edges, imparting a polished and professional look to the room. These finishing touches enhance the overall appearance and longevity of the faux concrete tile installation.
Cost Considerations
Vinyl tiles that mimic concrete are an affordable option for many homeowners. On average, you can expect to spend between $2 to $5 per square foot for the tiles. Additional costs may include adhesive, underlayment and tools if you don’t already have them. Overall, the total cost is much lower than that of installing real concrete, which can run upwards of $10 per square foot when factoring in materials and labor.
The Bottom Line:
Cement-effect flooring offers a stylish, practical and affordable alternative to real concrete. With the right selection and proper installation, you can enjoy the modern, industrial aesthetic of concrete without the associated costs and complications. Whether you’re renovating a kitchen, bathroom or living space, these tiles are a smart choice that combines beauty and functionality.
Last Updated June 21, 2024